
Raspberry Pi Remote Access: VNC, SSH, And Port Forwarding
Can you truly access your Raspberry Pi from anywhere in the world, as effortlessly as you access your own local network? The answer, surprisingly, is a resounding yes, and it's far more accessible than you might think.
The quest to remotely control a Raspberry Pi often begins with port forwarding. The user's experience typically starts with configuring their router to forward a specific port to their Raspberry Pi's internal IP address. A common initial step involves forwarding a port (such as port 5000) to the VNC port (usually 5901) on the Pi. Once this is set up, they attempt to connect using a VNC viewer, specifying the Pi's IP address and the display number (e.g., :1).
There are multiple methods available to remotely access your Raspberry Pi. Here's a simple overview:
- Thothubs Leaks Explore Chloe Difattas Content More
- Liza Soberano Enrique Gil News Updates You Need To Know
| Method | Description | Pros | Cons |
|---|---|---|---|
| Port Forwarding (SSH & VNC) | Configuring router to forward ports 22 (SSH) and 5900+ (VNC) to your Pi's IP. | Direct access, control over configuration. | Requires router configuration, potential security risks if not configured correctly. |
| VPN | Setting up a VPN server on your network or Pi. | Enhanced security, access as if on the local network. | Requires VPN setup, can impact network speed. |
| RealVNC Cloud | Using RealVNC's cloud service. | Easy setup, secure, no port forwarding required. | Requires a RealVNC account, free version has limitations. |
| Raspberry Pi Connect | Using Raspberry Pi's free screen sharing and remote shell service. | Simple setup, provided by Raspberry Pi. | Service availability depends on Raspberry Pi. |
For those new to the Raspberry Pi world, the process can feel daunting. The first hurdle is often understanding port forwarding. Routers act as gatekeepers, and without proper configuration, incoming connections from the internet won't reach your Raspberry Pi. Most routers will allow you to forward one external port to a different internal port on your pi. To access the Pi remotely, you'll need to change the default port number, and then get your VNC client to use the new port. Ssh and VNC involve opening a port on raspberry pi (vnc uses port 5900+n and ssh uses port 22) which potentially exposes your raspberry pi. Hackers actively look for raspberry pi devices with these open ports and default passwords, therefore you must change your password when turning on vnc.
The default VNC port is 5900, but VNC can launch multiple instances on other display ports, like :2, :3, and so on. When a VNC server is enabled, it listens on the port you entered. This command links port 5901 on your computer to port 5900 on the raspberry pi. You'll need to have a VNC viewer installed on your computer, which allows you to see what your Raspberry Pi is doing. There are a few ways you can log in to your Raspberry Pi, even if it's on one network and your system is on another network. However, it's important to note that port forwarding, while convenient, introduces potential security risks. Hackers are always on the lookout for devices with open ports and default passwords, so strong security practices are essential.
Alternatively, services like RealVNC offer a cloud-based solution, bypassing the need for port forwarding. RealVNC offers an easier approach compared to standard VNC with port forwarding. With this configuration in place, you can connect to the server from your local machine with the local IP of the Raspberry Pi and port 5901. The version of RealVNC on the Pi doesn't need ports opening, you simply sign up for a free account, use those credentials on both the Pi and your client software, the Pi connects to the RealVNC servers (acting as a proxy) and you connect to the 'cloud' device. It's included by default on Raspberry Pi OS and works from any computer or smartphone.
- Charli Xcxs Nationality Ethnicity What You Need To Know
- Betty Claire Kalb Gene Barry Love Story Legacy Uncovered
The steps to remotely control your Raspberry Pi often include the following:
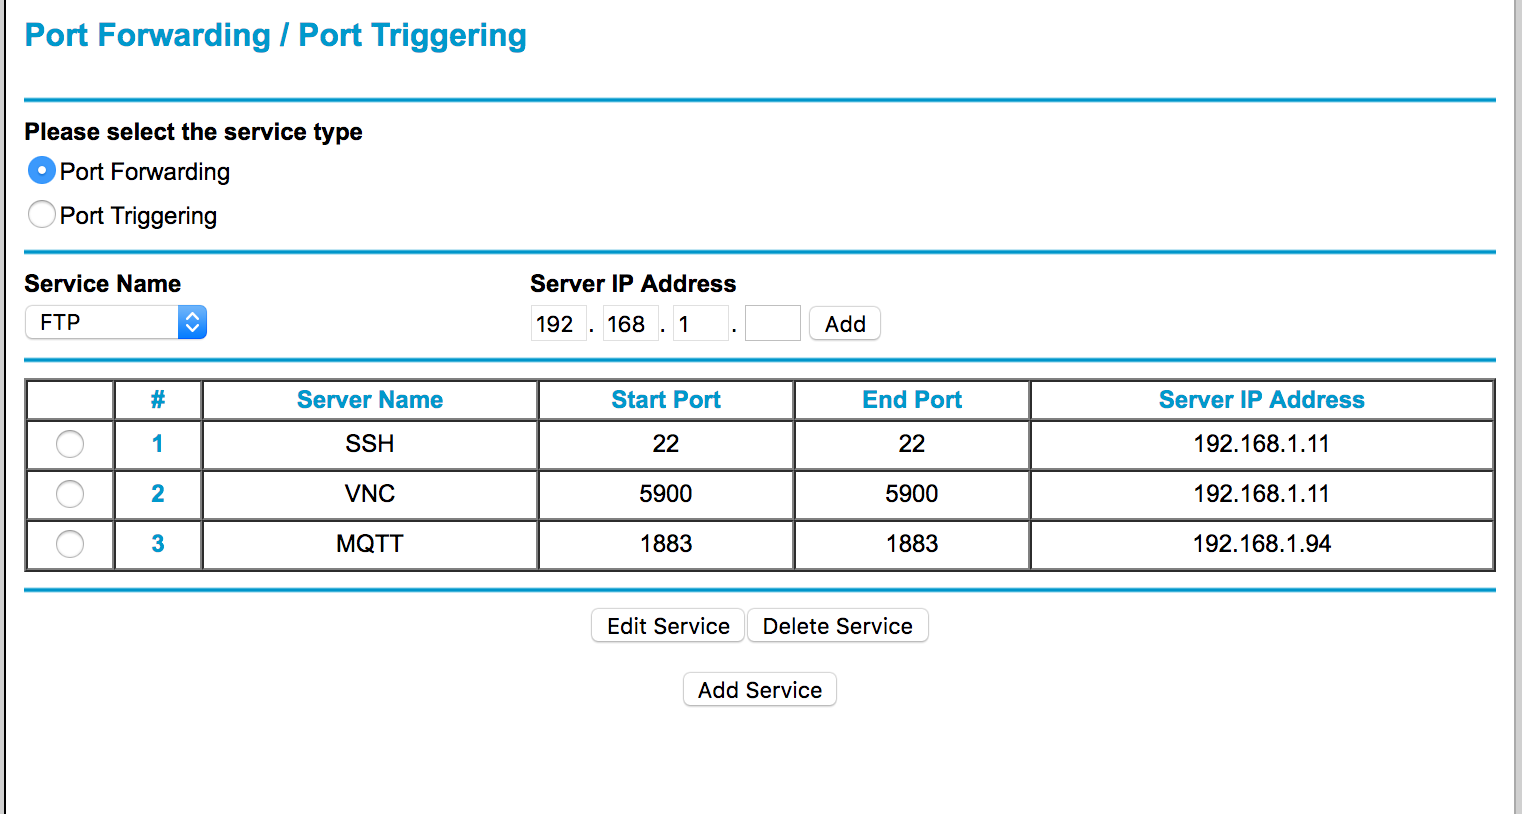
- Setting up Port Forwarding: This involves logging into your router's configuration interface (usually through a web browser) and creating a new port forwarding rule. You'll need to specify the Raspberry Pi's local IP address and the VNC port (default: 5900, or 5901 for display :1). Some routers require both external and internal port numbers.
- Installing a VNC Viewer: You'll need a VNC viewer (like TightVNC, RealVNC Viewer, or others) installed on the device you'll be using to connect to your Raspberry Pi.
- Connecting: Open the VNC viewer and enter your Raspberry Pi's public IP address (the IP address of your home network) followed by a colon and the port number you forwarded (e.g., your_public_ip:5901). If you are on the same local network, use the Pi's local IP address instead.
- Security Considerations: It's crucial to change the default password on your Raspberry Pi immediately after enabling VNC. For added security, consider using SSH tunneling (described below) or a VPN.
A popular alternative is to use SSH to tunnel your VNC connection. Here's how to do that:
- Enable SSH on your Raspberry Pi: SSH (Secure Shell) is a secure protocol for remote access. You can enable it through the Raspberry Pi configuration tool (
sudo raspi-config) or by creating an empty file named "ssh" in the boot partition of your SD card before booting the Pi. - Forward SSH Port (Optional, but recommended for external access): You'll need to configure your router to forward port 22 (the default SSH port) to your Raspberry Pi's internal IP address on port 22.
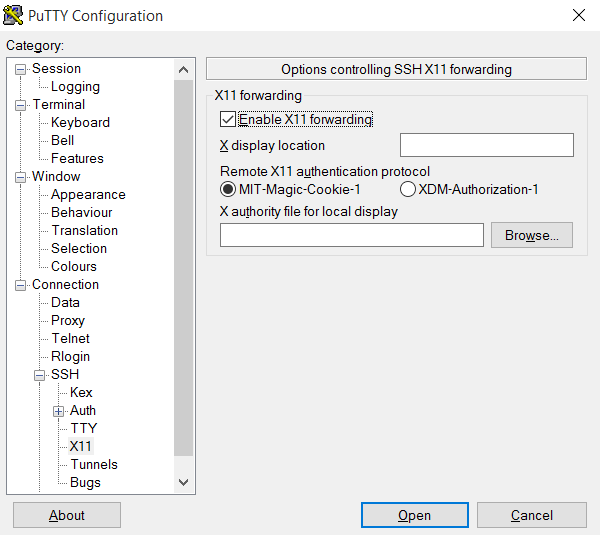
- Connect via SSH (from your local machine): Use an SSH client like PuTTY (Windows) or the built-in terminal (Linux/macOS) and connect to your Raspberry Pi using its public IP address and port 22 (or the port you forwarded).
- Create an SSH Tunnel: In your SSH client, set up a "tunnel" or "port forwarding" that links a local port on your computer to port 5900 (or the appropriate display port) on your Raspberry Pi. For example, with PuTTY, you'd go to "Connection > SSH > Tunnels" and enter a source port (e.g., 5901), a destination of `localhost:5900`, and choose the "Dynamic" option.
- Connect the VNC Viewer: Open your VNC viewer and connect to `localhost:5901`. The connection will go through the SSH tunnel and securely reach your Raspberry Pi.
If you are working on the same LAN, use tight VNC viewer with the pi's ip and specify :1 for the display. When the VNC server is enabled, it will be listening on the port you entered. For example, if using Homebridge and the Homebridge UI is accessible on port 80, you would choose 80 on the Pi.
For those who wish to avoid port forwarding altogether, there's a growing trend towards using services like RealVNC. With RealVNC, you can sign up for a free (home) account, use those credentials on your Pi (click the VNC icon to log in), and on your client software. The Pi then makes a connection to the RealVNC servers (they act as a proxy), and you connect to the 'cloud' device.
Raspberry Pi has an X11 server installed and configured, and an SSH client (like OpenSSH) is installed on both your local machine and the Raspberry Pi. An X server (like XQuartz on macOS or Xming on Windows) is installed on your local machine if you are using an operating system that does not include an X11 server by default. You will need to navigate to the port forwarding or virtual server settings in your router. Some routers require both external and internal port numbers.
Using the RealVNC cloud platform offers an easier approach compared to standard VNC with port forwarding. Automating SSH and VNC to start on boot makes remote access seamless. Whether you opt for port forwarding, SSH tunneling, or a cloud service like RealVNC, the ability to access your Raspberry Pi from anywhere in the world opens up a world of possibilities. With these steps completed, you now have the power to remotely monitor and manage your Raspberry Pi projects from anywhere!
If you are using a Raspberry Pi and trying to access it remotely, remember that the default VNC port is 5900, but multiple instances can be launched on other display ports, like :2, :3, and so on.
Article Recommendations
- Deepfake Community Exploring Mrdeepfakes Ai Face Swaps
- Dwayne The Rock Johnsons Parents Wrestling Lineage Heritage
Detail Author:
- Name : Mr. Jacinto Waelchi
- Username : ccollins
- Email : breana95@yahoo.com
- Birthdate : 1987-10-23
- Address : 64192 Ocie Trace Suite 921 Lake Gilberto, ND 09909
- Phone : +1-469-998-7335
- Company : Koch-Harvey
- Job : Human Resource Director
- Bio : Officia dicta enim et eligendi beatae. Ipsum quas in cum illum non. Sed officiis quibusdam quia et. Dignissimos aliquid veniam quibusdam labore ad quia consequatur.
Socials
linkedin:
- url : https://linkedin.com/in/judy_bogisich
- username : judy_bogisich
- bio : Nihil ipsam temporibus dolor.
- followers : 2994
- following : 489
instagram:
- url : https://instagram.com/bogisichj
- username : bogisichj
- bio : Possimus consequatur beatae consequatur eum. Nulla quae dolor enim quia consectetur.
- followers : 1849
- following : 55
twitter:
- url : https://twitter.com/judy_dev
- username : judy_dev
- bio : Quod ut quia voluptatem cumque. Molestiae nostrum quam rerum iure. Temporibus impedit quia cumque ut. Est est et maiores tempore animi est dolorum.
- followers : 3075
- following : 2956
facebook:
- url : https://facebook.com/judy.bogisich
- username : judy.bogisich
- bio : Et rerum quibusdam consequuntur laborum et vitae enim.
- followers : 1929
- following : 1650
