
Access Your Raspberry Pi Remotely: A Comprehensive Guide
Can you truly unlock the full potential of your Raspberry Pi, transforming it from a local project into a globally accessible hub? The answer, thankfully, is a resounding yes and the journey is far more accessible than you might think.
Imagine a world where your Raspberry Pi, nestled comfortably at home, serves as a personal server, a remote desktop, or a gateway to your own unique digital creations, all accessible from anywhere with an internet connection. This is the power of understanding and configuring your Raspberry Pi's public IP address and network settings.
The ability to remotely access your Raspberry Pi hinges on understanding the two primary types of IP addresses: public and private. Private IP addresses are the ones assigned within your local network, like the one your router gives to your Raspberry Pi (e.g., 192.168.1.100). These addresses are not directly visible from the public internet. Public IP addresses, on the other hand, are globally routable and assigned by your Internet Service Provider (ISP). This is the address the world uses to find your home network.
- Miya Melody Onlyfans Leaks Hot Content Videos
- Liza Soberano Enrique Gil News Updates You Need To Know
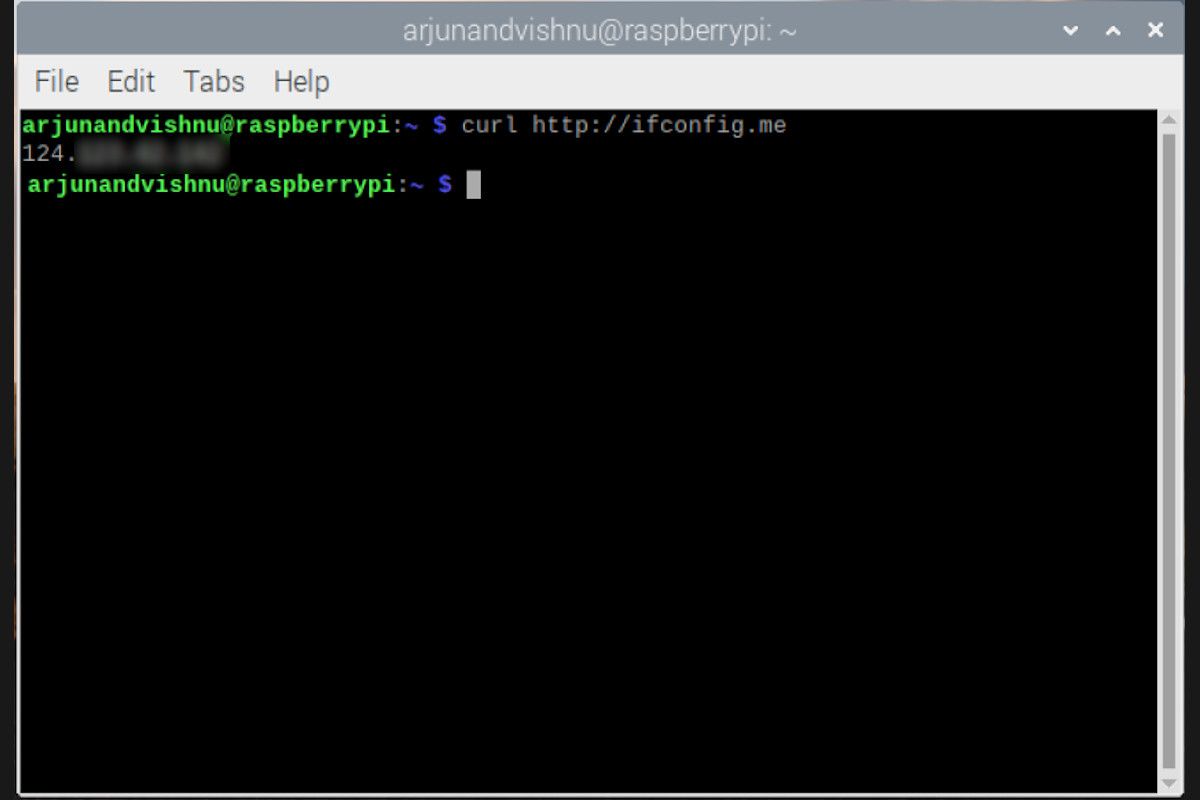
To connect to your Raspberry Pi from the outside, you will need its public IP address. You can find this through various online tools or by checking your router's settings. However, public IP addresses can be dynamic, meaning they can change periodically. This is where services like Dynamic DNS (DDNS) come in handy, mapping your changing public IP to a consistent domain name.
One fundamental aspect of accessing your Raspberry Pi remotely is understanding port forwarding. Your router acts as a gatekeeper, and port forwarding tells it which internal device (your Raspberry Pi, in this case) to direct incoming traffic to when it arrives on a specific port. For example, if you're running a web server on your Pi (typically on port 80), you need to configure your router to forward traffic on port 80 to your Raspberry Pi's private IP address.
Here's a table that contains essential details about setting up the Raspberry Pi to make it accessible remotely:
- Decoding The Buffbunnycontroversy What You Need To Know
- Bert Convys Spouses Anne Anderson Catherine Hall Relationships Explored
| Key Concept | Description |
|---|---|
| Public IP Address | The globally routable address assigned by your ISP, essential for external access. |
| Private IP Address | The address assigned within your local network (e.g., 192.168.1.100), not directly accessible from the internet. |
| Port Forwarding | Configuring your router to forward traffic on a specific port to your Raspberry Pi's internal IP address. |
| Dynamic DNS (DDNS) | A service that maps your dynamic public IP to a domain name, allowing consistent access even if your IP changes. |
| SSH (Secure Shell) | A secure protocol for remote access to your Raspberry Pi's command line. |
| VPN (Virtual Private Network) | Creates a secure, encrypted connection to your Raspberry Pi, adding an extra layer of security. |
For detailed information, check out the official Raspberry Pi Foundation documentation: Raspberry Pi Documentation.
Setting up a VPN (Virtual Private Network) is a robust approach, especially if you're concerned about security. If you have a VPS (Virtual Private Server), you could set up a VPN on it, which acts as an intermediary. You would then configure your Raspberry Pi to connect to the VPN server, and you can then connect to the VPN from your laptop or smartphone. This encrypts all your traffic and adds an extra layer of security, especially useful when connecting from public Wi-Fi hotspots like those found on a cruise line or in a coffee shop, where a public IP address might be unavailable.
To get started with a VPN setup, the Raspberry Pi needs to be able to connect to the VPS via SSH (Secure Shell). This requires creating an SSH key pair for secure authentication. You can then use a VPN client on your device to connect to the VPN server hosted on your VPS, thus indirectly accessing the Raspberry Pi. This configuration adds a layer of encryption, ensuring that all communication between your device and the Raspberry Pi is secured.
If you have limited access or are working from an office computer, using a VPN is still an option, but it's a bit more complicated as it involves the office's network configuration. However, if you're using your own laptop or smartphone, the process is more straightforward, simply requiring the installation and configuration of a VPN client.
Let's explore some specific scenarios. If you're trying to access a Grafana dashboard running on your Raspberry Pi, and you can access it locally using a URL such as `http://:3000`, but not remotely, it's very likely a port forwarding issue. Youll need to configure your router to forward traffic on port 3000 (or whatever port Grafana is running on) to the Raspberry Pi's private IP address. Then, you should be able to access the dashboard using your public IP address or a domain name if you have DDNS set up.
Another example: Let's say you're running a Bitwarden vault on your Raspberry Pi, accessible on your local network. If you can't access it outside your local network even after port forwarding and checking that the ports are open using tools like `nmap`, you need to verify a few things. First, confirm that the port forwarding is set up correctly in your router. Second, make sure the Bitwarden server is configured to listen on the correct port and that your firewall on the Raspberry Pi (if enabled) isn't blocking the connection.
For hosting websites or web services, consider creating a virtual host using a web server like Nginx. This allows you to define how your website or application responds to requests. You will need to configure your router to forward port 80 (for HTTP) or 443 (for HTTPS) to your Raspberry Pi. Use a command like `sudo nano /etc/nginx/sites-available/your_domain` to begin writing your virtual host configuration on your Raspberry Pi.
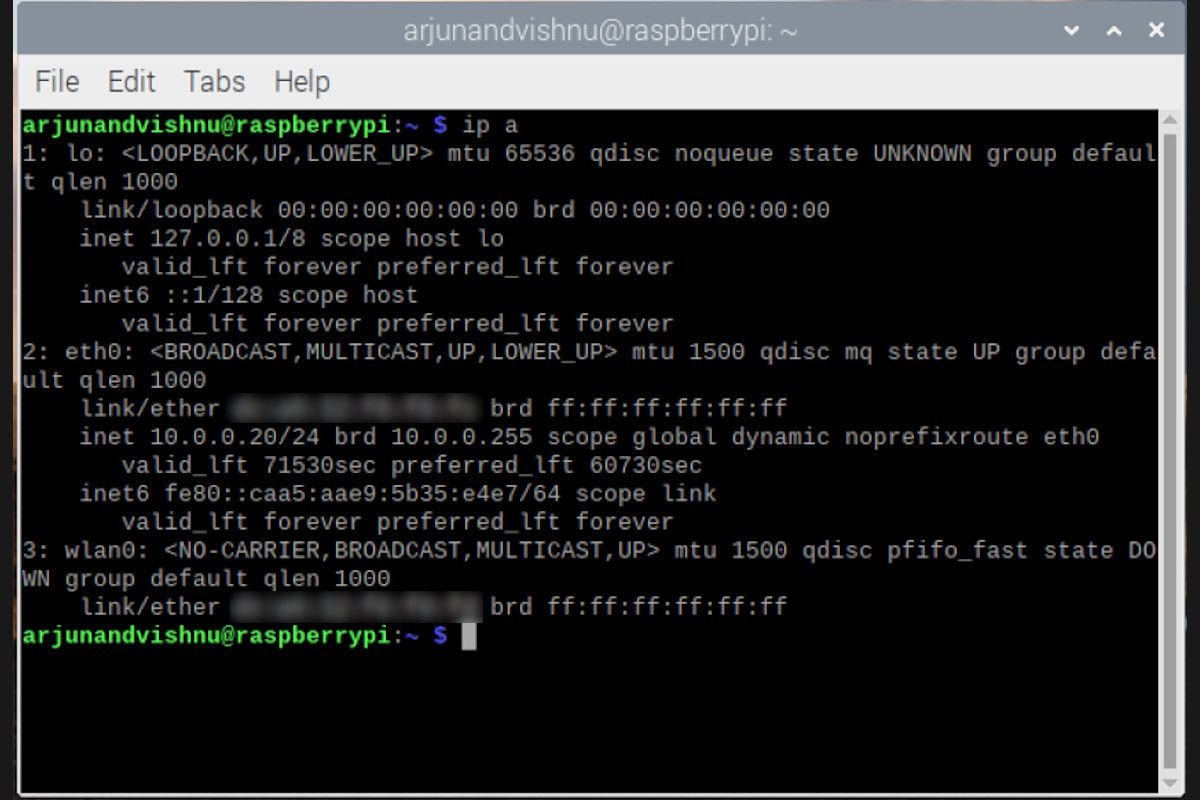
To find your Raspberry Pi's IP address, you can use several methods. If you have a display connected, you can use the terminal. On your Raspberry Pi, run commands such as `hostname -I` or `ip addr show`. These commands display the IP address assigned to your Raspberry Pi. You can also log into your router's administration panel and look for connected devices to find the Pi's IP address.
You could also restrict access to the localhost by setting `gatewayports no`. This way only users logged into the tunnel server could access the Raspberry Pi via SSH. The Raspberry Pi will need to connect to the VPS via SSH, so you should create an SSH key pair for this purpose.
For users with a Raspberry Pi Pico W, the process involves accessing the Raspberry Pi Pico W's IP address over the internet. You can then control the Pico W using an HTML code and buttons. To achieve remote access, you need to open access to the internet by inputting the public IP address of your Raspberry Pi and configuring your router to forward the appropriate port to the device.
For security, while remote access offers convenience, it comes with risks. You should secure your remote access by changing default passwords, using strong passwords, and updating your Raspberry Pis software regularly. Also, it is better to configure a firewall on your Raspberry Pi.
In situations where your public IP address changes dynamically, using a DDNS service is necessary. Configure your router to use this service to ensure that you always know the address for accessing your Raspberry Pi.
With the right configurations, your Raspberry Pi can become a versatile tool, accessible from anywhere in the world, opening up a world of possibilities for both personal and professional use.
Article Recommendations
- Exploring Tiktok Onlyfans What You Should Know Today
- Unveiling Jim Belushi Family From Chicago To Hollywood

Detail Author:
- Name : Prof. Coty Leffler I
- Username : dsanford
- Email : anthony83@gmail.com
- Birthdate : 1988-12-27
- Address : 81637 Isidro Manor Suite 722 Hattiemouth, FL 74977
- Phone : 1-903-206-6190
- Company : Lockman Ltd
- Job : Agricultural Crop Worker
- Bio : Iure dolores distinctio vel dignissimos minus est. Est consequatur voluptate iste provident commodi dolores. Voluptate fugiat impedit ut quisquam.
Socials
instagram:
- url : https://instagram.com/sedrick7965
- username : sedrick7965
- bio : Ut illum ea nisi et vel. Dolor corporis id sit quia quod. Modi qui est rerum perspiciatis.
- followers : 6145
- following : 2885
linkedin:
- url : https://linkedin.com/in/sedrick7542
- username : sedrick7542
- bio : Temporibus voluptatem dolores placeat labore.
- followers : 3147
- following : 68
